Northwind Creating the Web Application
From RifidiWiki
This is Step 6 in the Northwind Application Tutorial
Previous Step: Step 5: Send Notifications Over JMS
Next Step: Step 7: Write a Hello World Servlet
Contents
What you will learn
- How to set up a web application project
Create the project
Just like when we created a new project for the Northwind application, we need to create a new project for the web application.
- Go to File-> New -> Project. Select "Plug-in Project" from the file chooser. Click "Next."
- Assign the project a name. For web applications, the application needs to end in 'war'. I chose com.northwind.rfid.shipping.war. Click next.
- Assign the plugin an ID, which is used to identify the bundle in the OSGi environment. Give it a descriptive name as well as the the name of the entity (company, person, project) that will maintain the bundle. For this bundle, we don't need the Activator, so uncheck that box.
Add the necessary files and folders
- Download and unzip this file: File:Tutorial-war-files.zip. It's a zip file that contains two files you will need.
- In the main project, make a new folder called 'WEB-INF'
- In the WEB-INF folder, make a new folder called 'jsp'
- In the WEB-INF folder, make a new file called 'web.xml'
- Put the file 'spring.tld' in the WEB-INF folder.
- In the META-INF folder, make a new folder called 'xsd'
- Put the file 'spring-beans-2.5.xsd' in the xsd folder.
- In the root folder, create a file called 'index.jsp'
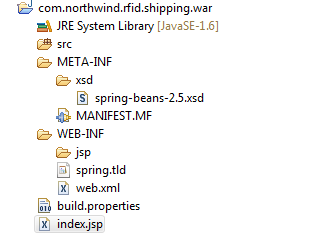
Your project should now look like this:
Configure the Manifest
Open up the Manifest.MF file. Click on the Dependencies tab.
- On the Required Plug-ins Section, add the following bundles
- com.northwind.rfid.shipping
- com.springsource.org.apache.taglibs.standard
- On the Imported Packages section, add the following packages
- javax.jms
- javax.servlet
- javax.servlet.http
- javax.servlet.jsp
- javax.servlet.jsp.jstl.core
- org.apache.activemq.command
- org.apache.activemq.spring
- org.springframework.jms.core
- org.springframework.jms.listener
- org.springframework.web.servlet
- org.springframework.web.servlet.mvc
- org.springframework.web.servlet.view
- Click the Manifest.MF tab. Add the following line to the end. Make sure there is an blank line as the last line of the Manifest.MF (and make sure there is no leading whitespace for this line).
Web-ContextPath: NORTHWIND-DEMO
Modify the web.xml
Open up the Web.xml file. Modify it to look like this:
<web-app version="2.4" xmlns="http://java.sun.com/xml/ns/j2ee"
	xmlns:xsi="http://www.w3.org/2001/XMLSchema-instance"
	xsi:schemaLocation="http://java.sun.com/xml/ns/j2ee
         http://java.sun.com/xml/ns/j2ee/web-app_2_4.xsd">

	<welcome-file-list>
		<welcome-file>index.jsp</welcome-file>
	</welcome-file-list>

	<jsp-config>
		<taglib>
			<taglib-uri>/spring</taglib-uri>
			<taglib-location>/WEB-INF/spring.tld</taglib-location>
		</taglib>
	</jsp-config>
</web-app>
When building web applications in java, the web.xml file provides configuration and deployment information for the Web components. Initially, we supply two pieces of information:
- The welcome file is page that is loaded by default when you go to 127.0.0.1:8080/NORTHWIND-DEMO
- The jsp-config provides the location of some jsp tags provided by spring.
Add a include.jsp
Make a new file called include.jsp inside of the jsp folder. Modify it to look like this:
<%@ page session="false"%>
<%@ taglib prefix="c" uri="http://java.sun.com/jsp/jstl/core" %>
<%@ taglib prefix="fmt" uri="http://java.sun.com/jsp/jstl/fmt" %>
This file simply includes some headers that we want on top of every JSP we will make. Therefore, in each JSP, we only have to have one include instead of several.
Modify index.jsp
Open up index.jsp. Modify it to look like this:
<%@ include file="/WEB-INF/jsp/include.jsp" %>

<jsp:useBean id="now" class="java.util.Date" />
Hello World at <fmt:formatDate value="${now}" pattern="MM.dd.yyyy" />
Here, we use some JSP tags to print out the date.
Run the web application
- Open up the run configuration and select the com.nortwind.rfid.shipping.war plugin. Run
- Point your browser to http://127.0.0.1:8080/NORTHWIND-DEMO/
If everything worked, you should see 'hello world' and the date.
