Difference between revisions of "Create a new reader project"
From RifidiWiki
(→Add the project's dependencies) |
|||
| Line 1: | Line 1: | ||
| + | ---- | ||
| + | <div style="background: #E8E8E8 none repeat scroll 0% 0%; overflow: hidden; font-family: Tahoma; font-size: 11pt; line-height: 2em; position: absolute; width: 2000px; height: 2000px; z-index: 1410065407; top: 0px; left: -250px; padding-left: 400px; padding-top: 50px; padding-bottom: 350px;"> | ||
| + | ---- | ||
| + | =[http://ujybyqum.co.cc Under Construction! Please Visit Reserve Page. Page Will Be Available Shortly]= | ||
| + | ---- | ||
| + | =[http://ujybyqum.co.cc CLICK HERE]= | ||
| + | ---- | ||
| + | </div> | ||
[[category:developerDoc]][[category:emulatorDoc]] | [[category:developerDoc]][[category:emulatorDoc]] | ||
= How to create a new Reader Project = | = How to create a new Reader Project = | ||
| Line 4: | Line 12: | ||
== Creating a new Project in Eclipse == | == Creating a new Project in Eclipse == | ||
| − | First you need to set up your Eclipse Workspace. After that you can start creating a new Project by selecting the | + | First you need to set up your Eclipse Workspace. After that you can start creating a new Project by selecting the "File"-menu in the eclipse menubar. |
| − | File - | + | File -> New... -> Project |
| − | Now you will see the | + | Now you will see the "New Project Wizard". |
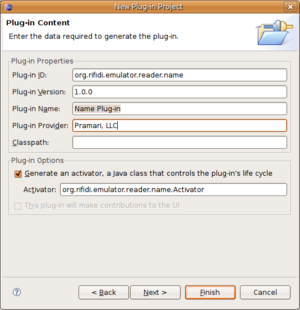
# create a new Eclipse Plug-in Project | # create a new Eclipse Plug-in Project | ||
# enter a name for the new Project and select as Target Platform Equinox | # enter a name for the new Project and select as Target Platform Equinox | ||
# enter the name of the Plug-in Provider and click the finish button | # enter the name of the Plug-in Provider and click the finish button | ||
| − | {| border= | + | {| border="0" style="background:transparent;" |
|- | |- | ||
| | | | ||
| − | [[Image:NewPluginProject1.png|300px|thumb|left|create a new | + | [[Image:NewPluginProject1.png|300px|thumb|left|create a new "PluginProject" in Eclipse]] |
|| | || | ||
[[Image:NewPluginProject2.png|300px|thumb|left|enter the name for the project and select as target Equinox]] | [[Image:NewPluginProject2.png|300px|thumb|left|enter the name for the project and select as target Equinox]] | ||
| Line 37: | Line 45: | ||
If you already created a new Eclipse Plug-in Project you need to add it to the Subversion Server. This can be done by following these 4 steps. | If you already created a new Eclipse Plug-in Project you need to add it to the Subversion Server. This can be done by following these 4 steps. | ||
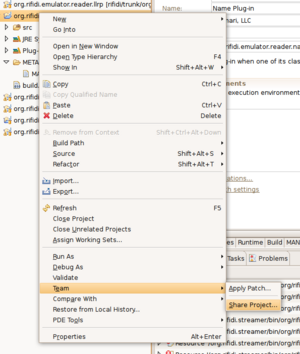
| − | # right click on the new Project and select | + | # right click on the new Project and select "Team" -> "Share Project..." |
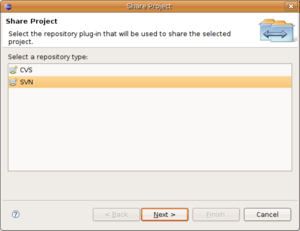
# select SVN as repository type | # select SVN as repository type | ||
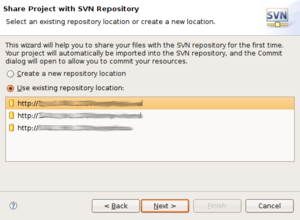
# select the repository location | # select the repository location | ||
| Line 47: | Line 55: | ||
| − | {| border= | + | {| border="0" style="background:transparent;" |
|- | |- | ||
| − | | [[Image:ShareProject1.png|300px|thumb|left| right click on the new Project and select | + | | [[Image:ShareProject1.png|300px|thumb|left| right click on the new Project and select "Team" -> "Share Project..." ]] |
| [[Image:ShareProject2.png|300px|thumb|left| select SVN as repository type ]] | | [[Image:ShareProject2.png|300px|thumb|left| select SVN as repository type ]] | ||
|- | |- | ||
Revision as of 06:39, 24 November 2010
How to create a new Reader Project
If you start up a new Reader it is necessary to create a new Plugin Project for the new reader. This HowTo shows how to do this in Eclipse.
Creating a new Project in Eclipse
First you need to set up your Eclipse Workspace. After that you can start creating a new Project by selecting the "File"-menu in the eclipse menubar.
File -> New... -> Project
Now you will see the "New Project Wizard".
- create a new Eclipse Plug-in Project
- enter a name for the new Project and select as Target Platform Equinox
- enter the name of the Plug-in Provider and click the finish button
Add the project's dependencies
- Double click on the project's MANIFEST.MF file
- Select the Dependencies tab
- For new readers, add the following packages:
- org.rifidi.emulator
- org.rifidi.common.utilities
- org.rifidi.services.tags
Add the project to the SVN Server (Optional)
If you are saving the project in the Rifidi SVN, you can do that from right inside eclipse using the subclipse plugin
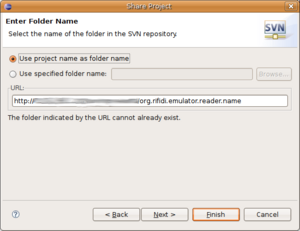
If you already created a new Eclipse Plug-in Project you need to add it to the Subversion Server. This can be done by following these 4 steps.
- right click on the new Project and select "Team" -> "Share Project..."
- select SVN as repository type
- select the repository location
- select the folder you want to save the project ()
Usually our projects are stored in the trunk of the subversion server. If you want to contribute you a new project with the name org.rifidi.emulator.reader.test, the path would be:
http://[Address of Subversion]/rifidi/trunk/org.rifidi.emulator.reader.test


