Northwind Tutorial
From RifidiWiki
This document provides step-by-step instructions on how to get started on developing your first application that runs on the Rifidi Edge Server. The application we will develop will use Esper to collect tag reads from a reader and put them on a JMS queue to be consumed by a client application. Many of the steps are applicable to many kinds of plugins for the edge server, including creating a sensor plugin.
Contents
The Scenario: Northwind Shipping
Congratulations! You are the proud new founder of Northwind Shipping Inc. -- "delivering packages faster than a caffeinated lightning bug"™. One of your core business strategies is to out perform your competitor -- Pony Express Shipping Inc. -- by capitalizing on increased efficiencies gained by your innovative use of technology. You have heard all the hype about RFID and want to employ in it your new, state-of-the-art distribution center. You have decided to use the Rifidi Edge Server to run the RFID applications you will need in your distribution center. This tutorial is a step-by-step guide on how to develop an RFID application and web UI using the Rifidi Edge Server API and deploy the application on the Rifidi Edge Server.
The Northwind distribution center has many complex processes, which should be automated as much as possible. Because you are new to RFID (and because too many processes would overwhelm this tutorial ;-) ) you have decided to start small and only implement a basic process with a few business rules. The first process you will automate using RFID is the receiving process (DC-Inbound). You have a dock door which will be receiving incoming shipments from trucks. The packages must be checked in at the dock door so that your ERP system knows the packages have arrived. Once this happens, the packages must be moved to a separate staging area where it needs to be weighed and prepared for further routing.
There are several goals for the application
- Track the packages from the dock door (stage 1) to the weigh station (stage 2).
- Send an alert if a package moves backwards (from stage 2 to stage 1).
- Send an alert if a package arrives at the weigh station but was not seen at the dock door
- Send an alert if a package departs the dock door and is not seen at the weigh station within five minutes
Prerequisites
For this tutorial, we will use Eclipse to develop the application. While it would be possible to develop the application in any IDE that you are familiar with, Eclipse provides great tooling around OSGi application development and deployment, and thus makes this process much easier. If this is your first time developing with eclipse, there will be a learning curve. However, the payoff is worth it.
To get started see Setting up a Development Environment.
Writing the RFID Application
Creating the new project
First thing you need to do is to create a new OSGi bundle (aka plug-in) project using the wizard provided by eclipse.
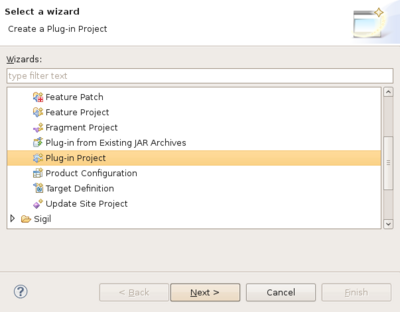
- Go to File-> New -> Project. Select "Plug-in Project" from the file chooser. Click "Next."

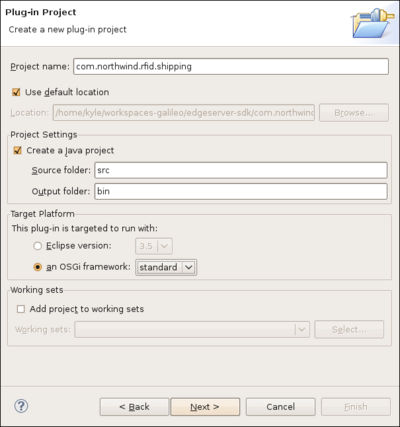
- Assign the project a name (for the purposes of this tutorial, I went with "com.northwind.rfid.shipping"). Make sure the plugin is targeted to run with the standard OSGi framework. This makes sure that your plugin is general enough to be deployed in any OSGi runtime (felix, knoplerfish, etc). Click next..
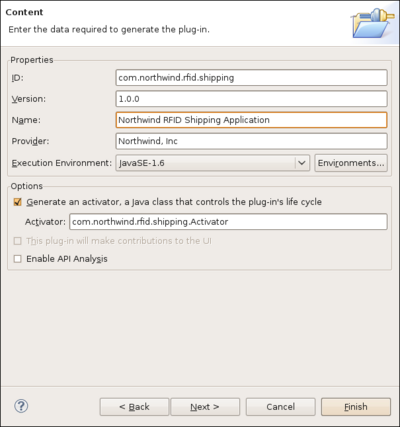
- Assign the plugin an ID, which is used to identify the bundle in the OSGi environment. Give it a descriptive name as well as the the name of the entity (company, person, project) that will maintain the bundle. For this bundle, we will keep the Activator, although most of the time when you use spring DM (as we are), it is not necessary to have the activator. Click Finish.


Injecting Esper
What you will learn:
- Declaring OSGi bundle dependencies in the manifest
- Dependency injection via spring
- Running an OSGi application in eclipse
- Redeploying bundles without restarting the server
Stating Dependencies in the Manifest
| ClassNotFoundException |
| Sometimes when running a bundle, you will get a ClassNotFoundException even though there were no compile-time errors in your source code. Many times, this is easily solved by adding the package of the problematic class to the import-package statement in the Manifest of your bundle. |
An OSGi bundle is simply a jar with some extra information in the manifest. Part of that information is the dependencies of the bundle. There are two ways to state dependency information: bundle-dependencies, and package-dependencies. A bundle dependency means that the bundle you are creating can see all of the exported package of the bundle that is depended on. A package dependency means that some bundle in the OSGi runtime must export that package, but it doesn't matter which bundle. Bundle dependencies are often simpler to state if you will use a large number of packages from the same bundle. However, package dependencies are more flexible since the dependency can be met from any bundle. They make alot of sense for things like javax or apache commons packages since you generally don't know or care exactly which bundle you will use.
In order to get Esper running, we will need to make two bundle-dependencies in the Manifest.
- Open up the Manifest.MF file in the META-INF folder
- Click on the dependencies tab at the bottom of the editor.
- Click "Add" in the Required Plug-ins section.
- Add org.rifidi.edge.core.services and org.rifidi.com.espertech.esper.
- Save the changes.

Creating the Application
Now it's time to actually create the source code for the application.
- Right-click on the 'com.northwind.rfid.shipping' package and select New->Class
- Give the class a name. I chose ShippingApp. Click finish.
- Add a private member of type EsperManagementService. Also make it volatile since the Spring thread will inject the reference (actually a dynamic-proxy) to the object. The volatile keyword will prevent us from experiencing the visibility problem in java.
- Add a public setter method. to set the service. This is the method that spring will call when it creates our object.
- Add a constructor. Add a printline in the constructor so we know when the object was started.
package com.northwind.rfid.shipping;

import org.rifidi.edge.core.services.esper.EsperManagementService;

/**
 * @author Kyle Neumeier - [email protected]
 *
 */
public class ShippingApp {

	/**Esper service*/
	private volatile EsperManagementService esperService;

	/**
	 * Constructor
	 */
	public ShippingApp() {
		System.out.println("HELLO RFID WORLD!");
	}

	/**
	 * Called by spring
	 * @param esperService
	 */
	public void setEsperService(EsperManagementService esperService) {
		this.esperService = esperService;
	}
}
Creating the Spring Context XML
Next we need to create the spring context XML file. Spring is an application development framework for java; it relieves the amount of boiler-plate code that is normally required when writing applications. In addition, through spring dynamic modules, spring is integrated with OSGi to help start up bundles and access the OSGi service registry among other things.
Rifidi Edge Server applications should use spring to create objectes, register them as services if need be, and look up services from the OSGi service registry and inject them into their objects. To create a spring context xml:
- Create a folder called 'spring' in the META-INF folder. Spring will read any xml files in this folder in and use it when starting up the bundle.
- Create an xml file. By convention, I call mine spring.xml
- Copy and paste the following xml into the file.
<beans xmlns="http://www.springframework.org/schema/beans"
	xmlns:xsi="http://www.w3.org/2001/XMLSchema-instance"
	xmlns:osgi="http://www.springframework.org/schema/osgi"
	xmlns:amq="http://activemq.apache.org/schema/core"
	xsi:schemaLocation="http://www.springframework.org/schema/beans
	http://www.springframework.org/schema/beans/spring-beans-2.5.xsd
    http://www.springframework.org/schema/osgi
    http://www.springframework.org/schema/osgi/spring-osgi.xsd">

	<!-- Create the  Application bean and inject dependencies-->
	<bean id="rfidapp" class="com.northwind.rfid.shipping.ShippingApp">
		<property name="esperService" ref="esperManagementService" />
	</bean>

	<!-- Get a reference to the Esper Management Service from the OSGi Service Registry -->
	<osgi:reference id="esperManagementService"
		interface="org.rifidi.edge.core.services.esper.EsperManagementService" />
</beans>
The first beans tag gives the xml processor the location of the xsds that define the namespace information. This allows us to use things like bean and osgi in the xml tags. This makes for cleaner, easier to read files.
The osgi:reference tag tells spring to look up a service in the OSGi service registry which implements the org.rifidi.edge.core.services.esper.EsperManagementService interface. Assign the object to id 'esperManagementService'.
The second bean tag tells spring to instantiate an object of type com.northwind.rfid.shipping.ShippingApp. In addition, we need to inject a bean that is referenced by the ID 'esperManagementService' (which we looked up in the previous tag). To set the service, use a setter method called "setEsperService" (set+<nameProperty>) which exists in the bean.
Running the Application
Now we are ready to run the application. To do this, we need to modify the run configuration slightly in eclipse.
- Go to Run-> Run Configurations...
- Select the "Edge Server" run configuration under 'OSGi Framework'
- Select the Bundles tab. You will see a list of bundles. Each bundle that has a check mark by it will be installed and started when you run the application. The bundles that serve as the 'core' Rifidi Edge Server have already been selected.
- Under 'Workspace', check the 'com.northwind.rfid.shipping' bundle.

- Click "Apply". Click "Run".

Now you should see "HELLO RFID WORLD!" appear in the console, along with other debug information.
Modifying and Redeploying the Application
Now suppose you want to modify your application to print a message when the EsperMangemnetService is injected. You can do this by modifying your application as follows.
	/**
	 * Called by spring
	 * @param esperService
	 */
	public void setEsperService(EsperManagementService esperService) {
		this.esperService = esperService;
		System.out.println("ESPER SERVICE INJECTED!");
	}
Now its time to test out your changes. One thing you could do is shut down the whole edge server and restart it. All the time spent starting and stopping the edge server can add up. One of the benefits of OSGi is being able to start,stop,and update individual bundles without restarting the rest of them. You can use this feature when developing to help cut down on wasted development time.
- Make sure the edge server is started inside eclipse
- Type 'ss'. This is an equinox command to list every bundle that is currently installed in the OSGi system.
- Locate 'com.northwind.rfid.shipping' in the list. Remember the number next to it. For me, the number is '3'..
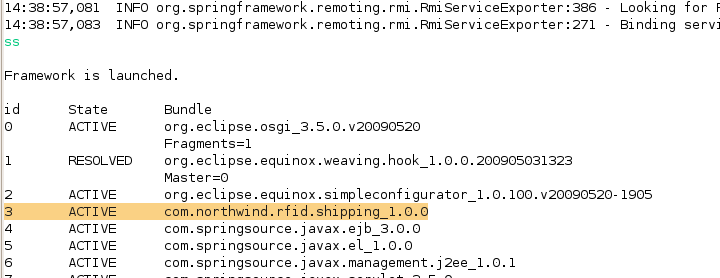
- Now type 'update <bundle_number>'. This is the equinox command to update and restart the given bundle.
- You should see both printlines appear.

Event Stream Processing
What you will learn:
- Using Rifidi Emulator to speed up RFID development.
- Controlling the edge server from the command line.
- Writing Esper queries and listeners.
Running Rifidi Emulator
Rifidi Emulator is a developer tool that emulates the interfaces of many popular RFID readers. It can be used to speed up development of RFID applications, since you can write applications that talk to RFID readers without the need for access for a physical reader. To get Rifidi Emulator up and running follow the steps in the Emulator User's Guide.
For the purposes of this tutorial, create two Alien ALR readers. The first reader will represent the Dock Door. Assign it IP address 127.0.0.1:20000 The second reader will represent the weigh station. Asssing it 127.0.0.1:20001. Create a few tags (does not matter which kind). Drag and drop the tags onto the antenna. Start the readers.
Instead of creating the readers yourself, you can load the configuration from File:Northwind-emulator.rfts.zip. Simply unizp it and choose File->Open IDE Configuration and choose the rtfs file.

Connecting to Emulator from the Edge Server
There are two ways (currently) to create a connection to a reader using the edge server. One is to use Workbench.
However, when developing applications on the edge server, it is often quicker to use the Edge Server Console.
Once the edge server is up and going, type the following commands into the console:
- readertypes. This lists the kind of reader adapters available. You should see one called Alien9800
- createreader Alien9800. This makes a new instance of a reader configuration with the default properties (including the IP & port, which by default is 127.0.0.1:20000 for the Alien). This will connect to the Dock Door, for the purposes of this demo. You should see output indicating the sensor was created along with it's ID (probably Alien9800_1).
- readers. This lists the created readers. You should see your reader listed here.
- createsession Alien9800_1. This creates a session that you will use to connect to Dock Door Reader.
- commandtypes This lists the available kind of commands you can execute.
- createcommand Alien9800-GetTagList. Like createreader this creates a new configuration with default properties, except this time its a command configuration.
- executecommand Alien9800_1 1 Alien9800-GetTagList_1 1000. This tells the edge server to schedule a Alien9800-GetTagList command on session 1 of Alien9800_1 once every second.
- startsession Alien9800_1 1 This tells the session to make the TCP/IP connection to the Dock Door Reader. At this point you should see activity on the console of the emulator.
- createreader Alien9800 Port 20001. This makes a new instance of a reader configuration that connects to 127.0.0.1:20001 (which is the weigh station, for the purposes of this demo).
- createsession Alien9800_2. This creates a session that you will use to connect to Weigh Station Reader.
- executecommand Alien9800_2 1 Alien9800-GetTagList_1 1000. You can execute the command that you've previously created on the second session.
- startsession Alien9800_2 1 This tells the session to make the TCP/IP connection to the Weigh Station Reader.
- save - This saves the configurations so that you don't have to type all these commands again.
Once you make sure this configuration is working, you can stop the session for now. Just type
- stopsession Alien9800_1 1 - Stop the Dock Door Reader
- stopsession Alien9800_2 1 - Stop the Weigh Station Reader
Writing an Esper query
Esper is an event processing language and run time. It allows you to define queries in an SQL-like syntax that operate on events rather than the table in a database. It is useful to think of esper queries as SQL queries turned upside down: rather than on-demand queries that operate on static data, you define a relatively static query and the data flows through the query as it is produced. For more information see How to write esper queries.
For this tutorial, we will define a simple query that returns all data produced by a certain reader. Modify MyApplication.java to add the following changes:
- A private Set to keep up with all esper queries that we will define
- Give a reference of this to the Activator (more on this later)
- Create and submit an esper query
- Stop the query when the bundle shuts down.
package com.mycompany.rfid.app;

import java.util.Set;
import java.util.concurrent.CopyOnWriteArraySet;

import org.rifidi.edge.core.services.esper.EsperManagementService;

import com.espertech.esper.client.EPStatement;

/**
 * @author Kyle Neumeier - [email protected]
 *
 */
public class MyApplication {

	/** Esper service */
	private volatile EsperManagementService esperService;
	/**All statements that have been defined so far*/
	private final Set<EPStatement> statements = new CopyOnWriteArraySet<EPStatement>();

	/**
	 * Constructor
	 */
	public MyApplication() {
		Activator.myApp=this;
	}

	/**
	 * Called by spring
	 *
	 * @param esperService
	 */
	public void setEsperService(EsperManagementService esperService) {
		this.esperService = esperService;
		start();
	}

	/**
	 * A method that starts the application
	 */
	private void start(){
		EPStatement query1 = esperService.getProvider().getEPAdministrator().createEPL(
				"select * from ReadCycle where readerID='Alien9800_1'");
		statements.add(query1);
	}

	/**
	 * Iterate through all statements and stop them.
	 */
	protected void stop(){
		for(EPStatement statement : statements){
			statement.destroy();
		}
	}
}
In addition, you will need to edit the Activator file to look like this:
/**
 * The Activator for the bundle. The start() method is called when the bundle is
 * starting up. The stop method is called when it is shutting down
 *
 * @author Kyle Neumeier - [email protected]
 *
 */
public class Activator implements BundleActivator {

	/** A reference to the instance of MyApplication */
	protected volatile static MyApplication myApp;

	/*
	 * (non-Javadoc)
	 *
	 * @see
	 * org.osgi.framework.BundleActivator#start(org.osgi.framework.BundleContext
	 * )
	 */
	public void start(BundleContext context) throws Exception {
	}

	/*
	 * (non-Javadoc)
	 *
	 * @see
	 * org.osgi.framework.BundleActivator#stop(org.osgi.framework.BundleContext)
	 */
	public void stop(BundleContext context) throws Exception {
		// stop MyApplication when the bundle shuts down
		myApp.stop();
	}

}
The key changes that were made with these changes:
- The start() method is called after the EsperService is injected by spring.
- A query is added to the Esper runtime. Once the query is added, Esper will begin listening for events. In the next section, we will write the code to handle the events
- A stop method (which cleans up the statements that you wrote from the Esper runtime) is called when the bundle stops. This happens, because you gave the reference of the instance of the application to Activator. The stop() method is called on the Activator by the OSGi runtime when that bundle is shutting down. Cleaning up the statements allows us to update the bundle without restarting the whole edge server.
Writing an esper listener
Sending out events with JMS
What you will learn:
- Importing the JMS services provided by Rifidi Edge Server
- Sending out events over JMS
Writing A Web Application
Exporting the application
What you will learn:
- Exporting your application out of eclipse
- Running the application in a deployed instance of Rifidi Edge Server