Difference between revisions of "Northwind Tutorial"
From RifidiWiki
(→Sending out events with JMS) |
(→Export Notification Package) |
||
| Line 1,007: | Line 1,007: | ||
</pre> | </pre> | ||
===Export Notification Package=== | ===Export Notification Package=== | ||
| + | In order for another bundle to be able to use the Notification classes we created, we need to export the notification package. | ||
| + | # Open the Manifest.MF. | ||
| + | # Select the Runtime Tab. | ||
| + | # In the Exported Packages section, click add. | ||
| + | # Choose the com.northwind.rfid.shipping.notification package. | ||
=Writing A Web Application= | =Writing A Web Application= | ||
Revision as of 18:42, 12 October 2009
This document provides step-by-step instructions on how to get started on developing your first application that runs on the Rifidi Edge Server. The application we will develop will use Esper to collect tag reads from a reader and put them on a JMS queue to be consumed by a client application. Many of the steps are applicable to many kinds of plugins for the edge server, including creating a sensor plugin.
Contents
- 1 The Scenario: Northwind Shipping
- 2 Prerequisites
- 3 Writing the RFID Application
- 3.1 Creating the new project
- 3.2 Injecting Esper
- 3.3 Event Stream Processing
- 3.4 Sending out events with JMS
- 4 Writing A Web Application
- 5 Exporting the application
The Scenario: Northwind Shipping
Congratulations! You are the proud new founder of Northwind Shipping Inc. -- "delivering packages faster than a caffeinated lightning bug"™. One of your core business strategies is to out perform your competitor -- Pony Express Shipping Inc. -- by capitalizing on increased efficiencies gained by your innovative use of technology. You have heard all the hype about RFID and want to employ in it your new, state-of-the-art distribution center. You have decided to use the Rifidi Edge Server to run the RFID applications you will need in your distribution center. This tutorial is a step-by-step guide on how to develop an RFID application and web UI using the Rifidi Edge Server API and deploy the application on the Rifidi Edge Server.
The Northwind distribution center has many complex processes, which should be automated as much as possible. Because you are new to RFID (and because too many processes would overwhelm this tutorial ;-) ) you have decided to start small and only implement a basic process with a few business rules. The first process you will automate using RFID is the receiving process (DC-Inbound). You have a dock door which will be receiving incoming shipments from trucks. The packages must be checked in at the dock door so that your ERP system knows the packages have arrived. Once this happens, the packages must be moved to a separate staging area where it needs to be weighed and prepared for further routing.
There are several goals for the application
- Track the packages from the dock door (stage 1) to the weigh station (stage 2).
- Send an alert if a package moves backwards (from stage 2 to stage 1).
- Send an alert if a package arrives at the weigh station but was not seen at the dock door
- Send an alert if a package departs the dock door and is not seen at the weigh station within five minutes
The Architecture
The solution that we will build will consist of two parts: the application bundle which will implement all the business rules, and the web application which will display the items. The two pieces will communicate using JMS.

Prerequisites
For this tutorial, we will use Eclipse to develop the application. While it would be possible to develop the application in any IDE that you are familiar with, Eclipse provides great tooling around OSGi application development and deployment, and thus makes this process much easier. If this is your first time developing with eclipse, there will be a learning curve. However, the payoff is worth it.
To get started see Setting up a Development Environment.
Writing the RFID Application
The first step is creating the bundle that will integrate with the Application Engine Layer.
Creating the new project
First thing you need to do is to create a new OSGi bundle (aka plug-in) project using the wizard provided by eclipse.
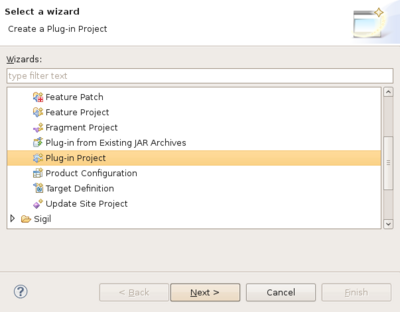
- Go to File-> New -> Project. Select "Plug-in Project" from the file chooser. Click "Next."

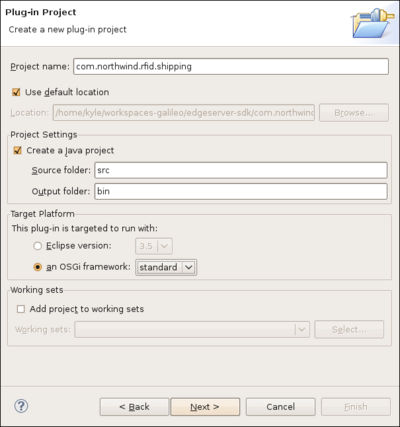
- Assign the project a name (for the purposes of this tutorial, I went with "com.northwind.rfid.shipping"). Make sure the plugin is targeted to run with the standard OSGi framework. This makes sure that your plugin is general enough to be deployed in any OSGi runtime (felix, knoplerfish, etc). Click next..
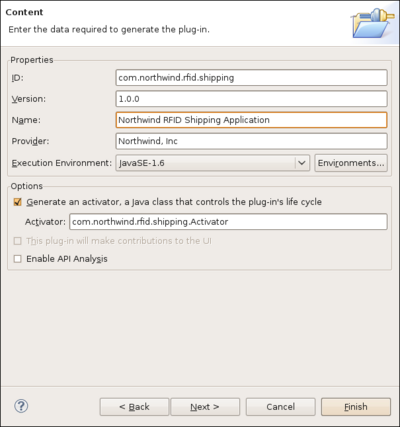
- Assign the plugin an ID, which is used to identify the bundle in the OSGi environment. Give it a descriptive name as well as the the name of the entity (company, person, project) that will maintain the bundle. For this bundle, we will keep the Activator, although most of the time when you use spring DM (as we are), it is not necessary to have the activator. Click Finish.


Injecting Esper
What you will learn:
- Declaring OSGi bundle dependencies in the manifest
- Dependency injection via spring
- Running an OSGi application in eclipse
- Redeploying bundles without restarting the server
Stating Dependencies in the Manifest
| ClassNotFoundException |
| Sometimes when running a bundle, you will get a ClassNotFoundException even though there were no compile-time errors in your source code. Many times, this is easily solved by adding the package of the problematic class to the import-package statement in the Manifest of your bundle. |
An OSGi bundle is simply a jar with some extra information in the manifest. Part of that information is the dependencies of the bundle. There are two ways to state dependency information: bundle-dependencies, and package-dependencies. A bundle dependency means that the bundle you are creating can see all of the exported package of the bundle that is depended on. A package dependency means that some bundle in the OSGi runtime must export that package, but it doesn't matter which bundle. Bundle dependencies are often simpler to state if you will use a large number of packages from the same bundle. However, package dependencies are more flexible since the dependency can be met from any bundle. They make alot of sense for things like javax or apache commons packages since you generally don't know or care exactly which bundle you will use.
In order to get Esper running, we will need to make two bundle-dependencies in the Manifest.
- Open up the Manifest.MF file in the META-INF folder
- Click on the dependencies tab at the bottom of the editor.
- Click "Add" in the Required Plug-ins section.
- Add org.rifidi.edge.core.services and org.rifidi.com.espertech.esper.
- Click "Add" in the Imported Packages section.
- Add net.sf.cglib.reflect
- Save the changes.

Creating the Application
Now it's time to actually create the source code for the application.
- Right-click on the 'com.northwind.rfid.shipping' package and select New->Class
- Give the class a name. I chose ShippingApp. Click finish.
- Add a private member of type EsperManagementService. Also make it volatile since the Spring thread will inject the reference (actually a dynamic-proxy) to the object. The volatile keyword will prevent us from experiencing the visibility problem in java.
- Add a public setter method. to set the service. This is the method that spring will call when it creates our object.
- Add a constructor. Add a printline in the constructor so we know when the object was started.
package com.northwind.rfid.shipping;

import org.rifidi.edge.core.services.esper.EsperManagementService;

/**
 * @author Kyle Neumeier - [email protected]
 *
 */
public class ShippingApp {

	/**Esper service*/
	private volatile EsperManagementService esperService;

	/**
	 * Constructor
	 */
	public ShippingApp() {
		System.out.println("HELLO RFID WORLD!");
	}

	/**
	 * Called by spring
	 * @param esperService
	 */
	public void setEsperService(EsperManagementService esperService) {
		this.esperService = esperService;
	}
}
Creating the Spring Context XML
Next we need to create the spring context XML file. Spring is an application development framework for java; it relieves the amount of boiler-plate code that is normally required when writing applications. In addition, through spring dynamic modules, spring is integrated with OSGi to help start up bundles and access the OSGi service registry among other things.
Rifidi Edge Server applications should use spring to create objectes, register them as services if need be, and look up services from the OSGi service registry and inject them into their objects. To create a spring context xml:
- Create a folder called 'spring' in the META-INF folder. Spring will read any xml files in this folder in and use it when starting up the bundle.
- Create an xml file. By convention, I call mine spring.xml
- Copy and paste the following xml into the file.
<beans xmlns="http://www.springframework.org/schema/beans"
	xmlns:xsi="http://www.w3.org/2001/XMLSchema-instance"
	xmlns:osgi="http://www.springframework.org/schema/osgi"
	xmlns:amq="http://activemq.apache.org/schema/core"
	xsi:schemaLocation="http://www.springframework.org/schema/beans
	http://www.springframework.org/schema/beans/spring-beans-2.5.xsd
    http://www.springframework.org/schema/osgi
    http://www.springframework.org/schema/osgi/spring-osgi.xsd">

	<!-- Create the  Application bean and inject dependencies-->
	<bean id="rfidapp" class="com.northwind.rfid.shipping.ShippingApp">
		<property name="esperService" ref="esperManagementService" />
	</bean>

	<!-- Get a reference to the Esper Management Service from the OSGi Service Registry -->
	<osgi:reference id="esperManagementService"
		interface="org.rifidi.edge.core.services.esper.EsperManagementService" />
</beans>
The first beans tag gives the xml processor the location of the xsds that define the namespace information. This allows us to use things like bean and osgi in the xml tags. This makes for cleaner, easier to read files.
The osgi:reference tag tells spring to look up a service in the OSGi service registry which implements the org.rifidi.edge.core.services.esper.EsperManagementService interface. Assign the object to id 'esperManagementService'.
The second bean tag tells spring to instantiate an object of type com.northwind.rfid.shipping.ShippingApp. In addition, we need to inject a bean that is referenced by the ID 'esperManagementService' (which we looked up in the previous tag). To set the service, use a setter method called "setEsperService" (set+<nameProperty>) which exists in the bean.
Running the Application
Now we are ready to run the application. To do this, we need to modify the run configuration slightly in eclipse.
- Go to Run-> Run Configurations...
- Select the "Edge Server" run configuration under 'OSGi Framework'
- Select the Bundles tab. You will see a list of bundles. Each bundle that has a check mark by it will be installed and started when you run the application. The bundles that serve as the 'core' Rifidi Edge Server have already been selected.
- Under 'Workspace', check the 'com.northwind.rfid.shipping' bundle.

- Click "Apply". Click "Run".

Now you should see "HELLO RFID WORLD!" appear in the console, along with other debug information.
Modifying and Redeploying the Application
Now suppose you want to modify your application to print a message when the EsperMangemnetService is injected. You can do this by modifying your application as follows.
	/**
	 * Called by spring
	 * @param esperService
	 */
	public void setEsperService(EsperManagementService esperService) {
		this.esperService = esperService;
		System.out.println("ESPER SERVICE INJECTED!");
	}
Now its time to test out your changes. One thing you could do is shut down the whole edge server and restart it. All the time spent starting and stopping the edge server can add up. One of the benefits of OSGi is being able to start,stop,and update individual bundles without restarting the rest of them. You can use this feature when developing to help cut down on wasted development time.
- Make sure the edge server is started inside eclipse
- Type 'ss'. This is an equinox command to list every bundle that is currently installed in the OSGi system.
- Locate 'com.northwind.rfid.shipping' in the list. Remember the number next to it. For me, the number is '3'..
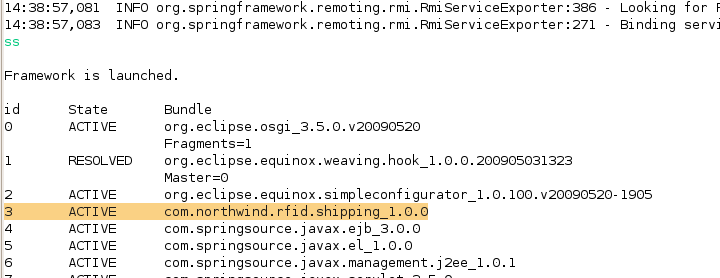
- Now type 'update <bundle_number>'. This is the equinox command to update and restart the given bundle.
- You should see both printlines appear.

Event Stream Processing
What you will learn:
- Using Rifidi Emulator to speed up RFID development.
- Controlling the edge server from the command line.
- Writing Esper queries and listeners.
Running Rifidi Emulator
Rifidi Emulator is a developer tool that emulates the interfaces of many popular RFID readers. It can be used to speed up development of RFID applications, since you can write applications that talk to RFID readers without the need for access for a physical reader. To get Rifidi Emulator up and running follow the steps in the Emulator User's Guide.
For the purposes of this tutorial, create two Alien ALR readers. The first reader will represent the Dock Door. Assign it IP address 127.0.0.1:20000 The second reader will represent the weigh station. Asssing it 127.0.0.1:20001. Create a few tags (does not matter which kind). Drag and drop the tags onto the antenna. Start the readers.
Instead of creating the readers yourself, you can load the configuration from File:Northwind-emulator.rfts.zip. Simply unizp it and choose File->Open IDE Configuration and choose the rtfs file.

Connecting to Emulator from the Edge Server
There are two ways (currently) to create a connection to a reader using the edge server. One is to use Workbench.
However, when developing applications on the edge server, it is often quicker to use the Edge Server Console.
Once the edge server is up and going, type the following commands into the console:
- readertypes. This lists the kind of reader adapters available. You should see one called Alien9800
- createreader Alien9800. This makes a new instance of a reader configuration with the default properties (including the IP & port, which by default is 127.0.0.1:20000 for the Alien). This will connect to the Dock Door, for the purposes of this demo. You should see output indicating the sensor was created along with it's ID (probably Alien9800_1).
- readers. This lists the created readers. You should see your reader listed here.
- createsession Alien9800_1. This creates a session that you will use to connect to Dock Door Reader.
- commandtypes This lists the available kind of commands you can execute.
- createcommand Alien9800-GetTagList. Like createreader this creates a new configuration with default properties, except this time its a command configuration.
- executecommand Alien9800_1 1 Alien9800-GetTagList_1 1000. This tells the edge server to schedule a Alien9800-GetTagList command on session 1 of Alien9800_1 once every second.
- startsession Alien9800_1 1 This tells the session to make the TCP/IP connection to the Dock Door Reader. At this point you should see activity on the console of the emulator.
- createreader Alien9800 Port 20001. This makes a new instance of a reader configuration that connects to 127.0.0.1:20001 (which is the weigh station, for the purposes of this demo).
- createsession Alien9800_2. This creates a session that you will use to connect to Weigh Station Reader.
- executecommand Alien9800_2 1 Alien9800-GetTagList_1 1000. You can execute the command that you've previously created on the second session.
- startsession Alien9800_2 1 This tells the session to make the TCP/IP connection to the Weigh Station Reader.
- save - This saves the configurations so that you don't have to type all these commands again.
Once you make sure this configuration is working, you can stop the sessions for now. Just type
- stopsession Alien9800_1 1 - Stop the Dock Door Reader
- stopsession Alien9800_2 1 - Stop the Weigh Station Reader
Preparing for Esper Queries
Esper is an event processing language and run time. It allows you to define queries in an SQL-like syntax that operate on events rather than the table in a database. It is useful to think of esper queries as SQL queries turned upside down: rather than on-demand queries that operate on static data, you define a relatively static query and the data flows through the query as it is produced. For more information see How to write esper queries.
For this tutorial, we will define a simple query that returns all data produced by a certain reader. Modify MyApplication.java to add the following changes:
- A private Set to keep up with all esper queries that we will define
- Give a reference of this to the Activator (more on this later)
- A start method where the esper queries will be submitted to the esper runtime
- A stop method that will clean things up. This will be called by the Activator.
package com.northwind.rfid.shipping;

import java.util.Set;
import java.util.concurrent.CopyOnWriteArraySet;

import org.rifidi.edge.core.services.esper.EsperManagementService;

/**
 * @author Kyle Neumeier - [email protected]
 *
 */
public class ShippingApp {

	/** Esper service */
	private volatile EsperManagementService esperService;
	/**All statements that have been defined so far*/
	private final Set<EPStatement> statements = new CopyOnWriteArraySet<EPStatement>();

	/**
	 * Constructor
	 */
	public ShippingApp() {
		Activator.myApp=this;
	}

	/**
	 * Called by spring
	 *
	 * @param esperService
	 */
	public void setEsperService(EsperManagementService esperService) {
		this.esperService = esperService;
		start();
		setUpAlerts();
		setupListeners();
	}

	/**
	 * A method that starts the application
	 */
	private void start(){
		//TODO: Esper Statements will go here!

	}

	/**
	 * A method that sets up listeners to handle esper events
	 */
	private void setupListeners(){
		//TODO: Esper Listeners will go here!

	}

	/**
	 * A method that sets up business alerts
	 */
	private void setUpAlerts(){
		//TODO: Alerts will go here!
	}

	/**
	 * Iterate through all statements and stop them.
	 */
	protected void stop(){
		for(EPStatement statement : statements){
			statement.destroy();
		}
	}
}
In addition, you will need to edit the Activator file to look like this:
/**
 * The Activator for the bundle. The start() method is called when the bundle is
 * starting up. The stop method is called when it is shutting down
 *
 * @author Kyle Neumeier - [email protected]
 *
 */
public class Activator implements BundleActivator {

	/** A reference to the instance of MyApplication */
	protected volatile static MyApplication myApp;

	/*
	 * (non-Javadoc)
	 *
	 * @see
	 * org.osgi.framework.BundleActivator#start(org.osgi.framework.BundleContext
	 * )
	 */
	public void start(BundleContext context) throws Exception {
	}

	/*
	 * (non-Javadoc)
	 *
	 * @see
	 * org.osgi.framework.BundleActivator#stop(org.osgi.framework.BundleContext)
	 */
	public void stop(BundleContext context) throws Exception {
		// stop MyApplication when the bundle shuts down
		myApp.stop();
	}

}
The key changes:
- The start() method is called after the EsperService is injected by spring.
- A stop method (which cleans up the statements that you will write from the Esper runtime) is called when the bundle stops. This happens, because you gave the reference of the instance of the application to Activator. The stop() method is called on the Activator by the OSGi runtime when that bundle is shutting down. Cleaning up the statements allows us to update the bundle without restarting the whole edge server.
Tracking the packages
| Class Hierarchy of Events |
| Esper is similar to SQL in syntax. However, with Esper, you query streams of objects rather than tables in a database. You can then query the objects using the and setter methods in the objects The Rifidi Edge Server, by default, will put objects of type ReadCycle into the Esper engine. Therefore, your queries will be focused on querying ReadCycle objects, and it is important to understand the class hierarchy of the events so that you will know what you can query for in esper. Please see ReadCycle Class Hierarchy for more information. |
The first and foremost goal of the application is to track the packages from the dock door to the weigh station. We will do this by creating two named windows in esper: one that keeps track of the tags that can currently be seen at the dock door. The second keeps track of tags currently seen at the weigh station. Think of a named window as an empty bucket for events. When a package is seen at the dock door, we need to insert the ID of the package into the dock door bucket.
The tougher question is to figure out when the package has departed from the dock door. Because of the physics of RFID, sometimes a tag is not read by the RFID reader every single time it polls its antennas, even though the item is still within the read zone. Depending on how we configure the RFID reader, it might be giving us several tag reports a second. We don't want to flood our system with false arrival and departure events, so let's assume that if a tag has not been seen for 10 seconds, the chances are good that it has moved from the dock door read zone (hopefully on its way to the weigh station!), and we need to remove it from the bucket.
The final part of this requirement is that we need to be notified in some way as packages arrive and depart. We do this through creating listeners that are hooked up to queries. The listeners allow us to "handle" the event in some way. For now, we will just print out a message (Later we can put a message on a JMS queue in order to inform some higher power). The key thing to note about the listeners is that we configured them to be notified when things are inserted into the "buckets" (i.e. named windows) and when things are deleted from the "buckets".
The Code
Here is a closer look at the esper statements required for this step:
	/**
	 * A method that starts the application
	 */
	private void start(){

// 1		create a named window that handles events at the Dock Door
		statements.add(esperService.getProvider().getEPAdministrator().createEPL(
			"create window dockdoor.std:firstunique(tag_ID) (tag_ID String)"));

// 2		create a named window that handles events at the Weight Station
		statements.add(esperService.getProvider().getEPAdministrator().createEPL(
			"create window weighstation.std:firstunique(tag_ID) (tag_ID String)"));

// 3		Insert information into the named windows
		statements.add(esperService.getProvider().getEPAdministrator().createEPL(
			"on ReadCycle[select * from tags]" +
			"insert into dockdoor select cast(tag.epc?, String) as tag_ID where readerID = 'Alien9800_1'" +
			"insert into weighstation select cast(tag.epc?, String) as tag_ID where readerID = 'Alien9800_2'"));

// 4		Remove events from the Dock Door Named Window
		statements.add(esperService.getProvider().getEPAdministrator().createEPL(
			"on pattern [every tag=dockdoor ->" +
				"(timer:interval(10 sec) and not dockdoor(tag_ID = tag.tag_ID))]" +
			"delete from dockdoor where tag_ID = tag.tag_ID"));

// 5		Remove events from the Dock Door Named Window
		statements.add(esperService.getProvider().getEPAdministrator().createEPL(
				"on pattern [every tag=weighstation ->" +
					"(timer:interval(10 sec) and not weighstation(tag_ID = tag.tag_ID))]" +
				"delete from weighstation where tag_ID = tag.tag_ID"));
	}

	/**
	 * A method that sets up listeners to handle esper events
	 */
	private void setupListeners(){

// 6		create a listener to handle Dock Door events
		StatementAwareUpdateListener dockDoorListener = new StatementAwareUpdateListener() {
			@Override
			public void update(EventBean[] arrivals, EventBean[] departures, EPStatement arg2,
					EPServiceProvider arg3) {
				if(arrivals!=null){
					for(EventBean bean : arrivals){
						System.out.println("Dock Door Arrival: " + bean.get("tag_ID"));
					}
				}

				if(departures!=null){
					for(EventBean bean : departures){
						System.out.println("Dock Door Departure: " + bean.get("tag_ID"));
					}
				}

			}
		};

// 7		Create a query that is triggered on insert and remove events from Dock Door Window
		EPStatement queryDockDoor = esperService.getProvider().getEPAdministrator().createEPL(
				"select irstream * from dockdoor");
		queryDockDoor.addListener(dockDoorListener);
		statements.add(queryDockDoor);

// 8		Create a listener to handle Weigh Station Events
		StatementAwareUpdateListener weighStationListener = new StatementAwareUpdateListener() {
			@Override
			public void update(EventBean[] arrivals, EventBean[] departures, EPStatement arg2,
					EPServiceProvider arg3) {
				if(arrivals!=null){
					for(EventBean bean : arrivals){
						System.out.println("Weigh Station Arrival: " + bean.get("tag_ID"));
					}
				}

				if(departures!=null){
					for(EventBean bean : departures){
						System.out.println("Weigh Station Departure: " + bean.get("tag_ID"));
					}
				}

			}
		};

// 9		Create a query that is triggered on insert and remove events from Weigh Station Window
		EPStatement queryWeighStation= esperService.getProvider().getEPAdministrator().createEPL(
				"select irstream * from weighstation");
		queryWeighStation.addListener(weighStationListener);
		statements.add(queryWeighStation);
	}
Explanation of the Code
- Create a named window "bucket" for the dock door. Notice two important things:
- We used a built in view for this window called firstunique, which (as the name implies, only retains the first unique entry for the filter value. This is important because the RFID reader is constantly sending us new tag reads every second, many of which could be the same tag over and over. If we did not specify firstunique, we would have a bucket full of duplicate tag reads!
- We specified the kind of information that can go into the bucket - A string called tag_ID. Another way to think about a named window is a database table. When we created the table, we created it with one column called tag_ID of type String.
- Create a named window for the weigh station. We create it the exact same way we create the previous one.
- Here is where we are filling the buckets up with tag data. There are a few important concepts here:
- Because the ReadCycle may have many individual events inside of it, we use the Constrained-Event Selection mechanism to only return the tags inside of each ReadCycle
- We use the on select clause to trigger the inserts whenever a new ReadCycle event arrives.
- We use the insert into clause to fill the named windows
- Inside the select clause, you will notice this: cast(tag.epc?, String). Without getting into too much detail about the object-oriented structure of ReadCycle, it is not known at compile time whether or not the events inside of a ReadCycle will have a property called epc or not (this generalization allows us to process tags that are not EPC Gen2 Tags). Because of this uncertainty, we have to use the duck-typing feature (which is signified by the '?'). In addition, we use the cast function of esper.
- Here we delete the tags from the dock door window
- Here we use the on delete clause to remove tags.
- The pattern uses the every operator to indicate that the pattern should be repeated and not just fire once and stop.
- We use the [-> (followed by) operator to indicate that once we have seen a new tag arrive at the Dock Door, we are interested in an event that will follow it.
- The timer:interval causes the patter to wait for the specified length of time before continuing.
- The and and not operators perform logical truth operations on the pattern.
- This statement removes tags from the Weigh Station, using the same principle as how we remove tags from the Dock Door
- This is a listener that will handle arrival and departure events from the dock door.
- The first argument contains all the events in the insert stream. The second argument argument contains all events in the remove stream for the update.
- The tag_ID property is there because we declared it when we defined the named window in the first step.
- This statement creates the esper statement that selects the events that will feed the listener.
- The only special part of this query is the irstream keyword. This stands for "insert and remove stream". It tells esper that we are interested in events that are entering and leaving the named window. By default, esper would only notify us of events that arrive in the named window.
- This is the handler for for arrival and departure events from the weigh station.
- This is the statement that feeds the weigh station handler.
Run the Code!
Now, make sure the sessions in the edge server are started and collecting tag data (you can use the startsession) command on the osgi console if you need to. In the console, type update <bundle_id_of_application> to update your Northwind Application bundle to reflect your latest changes. You can drag and drop tags on antennas in the emulator, and you should be able to see Arrival and Departure events happen on the console.

Alert: Package Moved Backwards!
At this point, we can track the items that can be seen at the various read zones in our scenario. Now we need to implement the functionality that will fire an alert when an item moves backwards (that is from the weigh station to the dock door).
The Code
	/**
	 * A method that sets up business alerts
	 */
	private void setUpAlerts(){
// 1		Create  a window for alert messages
		statements.add(esperService.getProvider().getEPAdministrator().createEPL(
			"create window alerts.win:length(20) (alert_type int, tag_ID String)"));

// 2		create a window for item leaving the weighstation
		statements.add(esperService.getProvider().getEPAdministrator().createEPL(
			"create window weighstation_recent.std:unique(tag_ID) (tag_ID String)"));

// 3		Insert items into weightstation_recent once they leave weighstation
		statements.add(esperService.getProvider().getEPAdministrator().createEPL(
			"insert rstream into weighstation_recent select tag_ID from weighstation"));

// 4		whenever an item is seen at the weighstation and then seen at the dockdoor, insert a new item into the alerts window
		statements.add(esperService.getProvider().getEPAdministrator().createEPL(
			"on pattern[every-distinct(tag.tag_ID) tag=weighstation_recent -> dockdoor(tag_ID = tag.tag_ID)] " +
			"insert into alerts " +
			"select 1 as alert_type, tag_ID as tag_ID " +
				"from weighstation_recent where tag_ID = tag.tag_ID"));
	}
The following code is an addition to the setupListeners() method that was previously defined:
		// Create a listener to handle Alerts
		StatementAwareUpdateListener alertListener = new StatementAwareUpdateListener() {
			@Override
			public void update(EventBean[] arrivals, EventBean[] departures,
					EPStatement arg2, EPServiceProvider arg3) {
				if (arrivals != null) {
					for (EventBean bean : arrivals) {
						int alertType = (Integer) bean.get("alert_type");
						String id = (String) bean.get("tag_ID");
						switch (alertType) {
						case 1:
							System.out.println("Package moved backwards: " + id );
							break;

						}
					}
				}
			}
		};

		//Create a query that is triggered on insert and remove events from Weigh Station Window
		EPStatement queryAlert= esperService.getProvider().getEPAdministrator().createEPL(
				"select * from alerts");
		queryAlert.addListener(alertListener);
		statements.add(queryAlert);
Explanation of the Code
- First we need to create a window that will hold alerts.
- Using the win:length() view, the window will only keep track of the last 20 alerts
- This window is defined to hold two pieces of information per entry: an int that is the alert type, and a string that is the tag ID
- Next we create a window that will hold tags that have departed from the weigh station
- This statement inserts items that have left the weighstation window into the weighstation_recent window
- Finally we get to define the rule! This rule simply looks for the pattern of an event entering the weighstation_recent window followed by an event entering the dockdoor window which have the same ID. Once this occurs, it makes a new entry in the alerts window.
- We use the every-distinct operator to ensure that we will only match the same tag once in the pattern.
- We also insert '1' as the alert type. We will assume that that event type corresponds to a 'tag moved backwards' alert.
Alert: Package Skipped the Dock Door!
The next requirement for the Northwind application is to detect when a package appears at the weigh station but was never seen at the dock door. This is a bit different from detecting events going from the weigh station back to the dock door, because we cannot use the followed-by operator on events coming out of the dock door. It is precisely the events that were never seen at the dock door we are looking for!
The code
Add the following statements to the setUpAlerts method:
// 1		create a window for item leaving the dock door
		statements.add(esperService.getProvider().getEPAdministrator().createEPL(
			"create window dockdoor_recent.std:unique(tag_ID) (tag_ID String)"));

// 2		Insert items into dockdoor_recent once they leave dockdoor
		statements.add(esperService.getProvider().getEPAdministrator().createEPL(
			"insert rstream into dockdoor_recent select tag_ID from dockdoor"));

// 3		Any time we see a new weighstation event, check to see if it is not already in dockdoor_recent.  If not, make a new alert.
		statements.add(esperService.getProvider().getEPAdministrator().createEPL(
			"insert into alerts " +
			"select 2 as alert_type, tag_ID as tag_ID " +
			"from weighstation as w " +
			"where not exists (select * from dockdoor_recent as d where d.tag_ID = w.tag_ID)"));
In addition, you need to modify the switch statement of the alerts handler:
		switch (alertType) {
		case 1:
			System.out.println("Package moved backwards: " + id );
			break;
		case 2: System.out.println("Package skipped the dock door: " + id);
			break;

		}
Explanation of the Code
- Create a named window that will hold tags that have recently departed from the dock_door
- Next we insert the tags that have left the dockdoor window into the dockdoor_recent window.
- This statement inserts a new alert into the alerts window whenever a tag arrives at the weighstation window which has not been seen at the dock door.
- We will assume that 2 is the alert type of the 'package skipped dock door' alert.
- The statement select * from dockdoor_recent as d where d.tag_ID = w.tag_ID is a subquery that will return results (just like a normal query). By using it in conjunction with the exists condition, we can test whether or not the subquery returned any results. If it does not return results, we need to fire an alert.
Alert: Package is Lost!
The Code
Add the following to the setUpAlerts method
// 1		Create a new alert whenever a package departs from the dock door and is not seen at the weighstation with a given time period
		statements.add(esperService.getProvider().getEPAdministrator().createEPL(
			"on pattern[every-distinct(tag.tag_ID) tag=dockdoor_recent -> " +
			"(timer:interval(5 min) and not weighstation(tag_ID = tag.tag_ID))] " +
			"insert into alerts " +
			"select 3 as alert_type, tag_ID as tag_ID " +
			"from dockdoor_recent where (tag_ID = tag.tag_ID)"));
In addition, you need to modify the switch statement of the alerts handler:
			switch (alertType) {
			case 1:	System.out.println("Package moved backwards: " + id );
				break;
			case 2: System.out.println("Package skipped the dock door: " + id);
				break;
			case 3: System.out.println("Package is lost: " + id);
				break;
			}
Explanation of the Code
- The only statement we have to add to implement the required functionality is, like the 'Package cannot move backwards' alert, implemented in two parts. The first part (on pattern) looks for a sequence to happen. The second part (insert into) does something whenever the first part happens.
- We can use the followed-by operator to specify that that we should look for an event leaving a dockdoor followed by a specific time period (15 seconds in our case) and no package with a corresponding id at the weigh station.
- When this pattern triggers, we need to insert a new event into the alerts window.
- For this kind of alert, we will assume the type will be 3.
Sending out events with JMS
What you will learn:
- Importing the JMS services provided by Rifidi Edge Server
- Exporting packages from a bundle
- Sending out events over JMS
Once you have the esper queries defined, debugged, and working, it's time to figure out exactly how you want to react to the various events. You might want to log the events to a database. You may want to expose the events to a .Net application via web services. Or you might want to integrate with an ERP system such as SAP. For the Northwind application, we want to send out notifications over Java Messaging Service (JMS) for a web application (which we will build soon) to display.
Create Notification Classes
| Creating an API Bundle |
| For this example, we are creating the notification classes in the same bundle that our application is in in order to simplify the tutorial. This means that our web application will have to have a direct dependency on the application bundle, so that the web bundle has access to the notification classes. A cleaner solution would be to extract out the notification classes into a separate bundle so that both the application bundle and the web bundle would depend on the API bundle. |
The first in using JMS to alert another component about the RFID events that we are capturing in our Esper listeners is to create a few Java classes that define the kind of events we want to send out. In particular we will need:
- ItemArrivalNotification that is sent out when an item has arrived at a zone (either dock door or weigh station).
- ItemDepartureNotification that is sent out when an item has departed from a zone.
- AlertNotification that is sent when one of the three exception cases happens.
In addition, we will define two enums:
- EZone that defines the two zones we have in our system.
- EAlertType that defines the three alert types that we have.
There are three steps:
- Create a new package. Right-click on the com.northwind.rfid.shipping package and select new->package. Name the package com.northwind.rfid.shipping.notifications.
- Create the classes (see below)
- Export the com.northwind.rfid.shipping.notifications package in the Manifest. This allows other OSGi bundles to see this package. To do this, open up the Manifest.MF file. Click on the Runtime tab. In the 'Exported Packages' section, click Add. Choose the com.northwind.rfid.shipping.notifications package. Save.
Notification Classes
ItemArrivalNotification
package com.northwind.rfid.shipping.notifications;

import java.io.Serializable;

/**
 * This class defines an Item Arrival Event
 * @author Kyle Neumeier - [email protected]
 *
 */
public class ItemArrivalNotification implements Serializable{
	/** Default Serial ID */
	private static final long serialVersionUID = 1L;
	/** The zone that this tag arrived at*/
	private final EZone zone;
	/** The tag that arrived */
	private final String tag_Id;

	/**
	 * @param zone
	 *            The zone that this tag arrived at
	 * @param tag_id
	 *            The ID of the tag that arrived
	 */
	public ItemArrivalNotification(EZone zone, String tag_id) {
		this.zone = zone;
		this.tag_Id = tag_id;
	}

	/**
	 * @return the zone
	 */
	public EZone getZone() {
		return zone;
	}

	/**
	 * @return the tag_id
	 */
	public String getTag_Id() {
		return tag_Id;
	}
}
ItemDepartureNotification
package com.northwind.rfid.shipping.notifications;

import java.io.Serializable;

/**
 * This class defines an Item Departure Event
 *
 * @author Kyle Neuemeier - [email protected]
 *
 */
public class ItemDepartureNotification implements Serializable {
	/** Default Serial ID */
	private static final long serialVersionUID = 1L;
	/** The zone that this tag departed from */
	private final EZone zone;
	/** The tag that departed */
	private final String tag_Id;

	/**
	 * @param zone
	 *            The zone that this tag departed from
	 * @param tag_Id
	 *            The ID of the tag that departed
	 */
	public ItemDepartureNotification(EZone zone, String tag_Id) {
		this.zone = zone;
		this.tag_Id = tag_Id;
	}

	/**
	 * @return the zone
	 */
	public EZone getZone() {
		return zone;
	}

	/**
	 * @return the tag_id
	 */
	public String getTag_id() {
		return tag_Id;
	}
}
AlertNotification
package com.northwind.rfid.shipping.notifications;

import java.io.Serializable;

/**
 * This class defines an Alert Event.
 *
 * @author Kyle Neumeier - [email protected]
 *
 */
public class AlertNotification implements Serializable{

	/**Default Serial ID*/
	private static final long serialVersionUID = 1L;
	/** The alert message */
	private final EAlertType alert;
	/** The tag that the alert applies to */
	private final String tagID;

	/**
	 * @param alert
	 * @param tagID
	 */
	public AlertNotification(EAlertType alert, String tagID) {
		super();
		this.alert = alert;
		this.tagID = tagID;
	}

	/**
	 * @return the alert
	 */
	public EAlertType getAlert() {
		return alert;
	}

	/**
	 * @return the tagID
	 */
	public String getTagID() {
		return tagID;
	}

}
EZone
package com.northwind.rfid.shipping.notifications;

/**
 * This enum  lists the read zones for our system.
 * @author Kyle Neumeier - [email protected]
 *
 */
public enum EZone {
	DOCK_DOOR,
	WEIGH_STATION;
}
EAlertType
package com.northwind.rfid.shipping.notifications;

/**
 * This enum lists the kinds of alerts that are defined.
 * @author Kyle Neumeier - [email protected]
 *
 */
public enum EAlertType {
	Package_Moved_Backwards,
	Package_Skipped_Dock_Door,
	Package_is_Lost;
}
Use JMS to Send out Notifications in Application
In this step we will modify our code to use the Notification objects to send out notifications over JMS.
Add JMS Dependencies
The first step you need to do is to add the the necessary package dependencies to your bundle. Open up the Manifest.MF, select the 'Dependencies' tab. On the 'Imported Packages' section click add choose the following packages.
- javax.jms
- org.apache.activemq.command
- org.springframework.beans.factory
- org.springframework.core
- org.springframework.jms
- org.springframework.jms.core
Add JMS Setters
The next step is to modify ShippingApp to have a setter for the JMSTemplate and Destination objects that spring can use to inject them.
	/** Esper service */
	private volatile EsperManagementService esperService;
	/**All statements that have been defined so far*/
	private final Set<EPStatement> statements = new CopyOnWriteArraySet<EPStatement>();
	/**JMS Destination to send messages to*/
	private volatile Destination destination;
	/**JMS Template to use to send messages*/
	private volatile JmsTemplate template;

	/**
	 * Constructor
	 */
	public ShippingApp() {
		Activator.myApp=this;
	}

	/**
	 * Called by spring
	 *
	 * @param esperService
	 */
	public void setEsperService(EsperManagementService esperService) {
		this.esperService = esperService;
		start();
		setUpAlerts();
		setupListeners();
	}

	/**
	 * Called by spring
	 * @param destination the destination to set
	 */
	public void setDestination(Destination destination) {
		this.destination = destination;
	}

	/**
	 * Called by spring
	 * @param template the template to set
	 */
	public void setTemplate(JmsTemplate template) {
		this.template = template;
	}
Modify spring.xml to inject the JMS objects
Open up the spring.xml file. There are a few things to take care of here.
- Lookup the JMS template from the OSGi service registry. You will use this object to send out notifications
- Create a new JMS Destination (specifically a Topic desitination). This is where the notifications will be sent.
- Inject the template and destination into the application.
<beans xmlns="http://www.springframework.org/schema/beans"
	xmlns:xsi="http://www.w3.org/2001/XMLSchema-instance"
	xmlns:osgi="http://www.springframework.org/schema/osgi"
	xmlns:amq="http://activemq.apache.org/schema/core"
	xsi:schemaLocation="http://www.springframework.org/schema/beans
	http://www.springframework.org/schema/beans/spring-beans-2.5.xsd
    http://www.springframework.org/schema/osgi
    http://www.springframework.org/schema/osgi/spring-osgi.xsd">

	<!-- Create the  Application bean and inject dependencies-->
	<bean id="rfidapp" class="com.northwind.rfid.shipping.ShippingApp">
		<property name="esperService" ref="esperManagementService" />
		<property name="destination" ref="NorthwindTopic" />
		<property name="template" ref="jmsTemplate" />
	</bean>

	<!--Get a reference to the Esper Management Service from the OSGi Service Registry-->
	<osgi:reference id="esperManagementService"
		interface="org.rifidi.edge.core.services.esper.EsperManagementService" />

	<!-- Create a new Topic to publish Notifications to -->
	<bean id="NorthwindTopic" class="org.apache.activemq.command.ActiveMQTopic">
		<property name="physicalName" value="com.northwind.rfid.shipping.topic" />
	</bean>

	<!-- Lookup the JMS Template from OSGi Service Registry -->
	<osgi:reference id="jmsTemplate"
		interface="org.springframework.jms.core.JmsTemplate" bean-name="externalJMSTemplate" />
</beans>
Add a send method
We can encapsulate the logic required to send out a JMS message in one method. Add this method to the application class
/**
	 * Method to use to send out notifications over JMS. It seriallizes the
	 * message into an array of bytes, then sends those bytes out over JMS
	 *
	 * @param notification
	 */
	private void send(final Serializable notification) {
		if (template == null || destination == null) {
			// TODO: Log error message;
			return;
		}
		try {
			template.send(destination, new MessageCreator() {
				@Override
				public Message createMessage(Session arg0) throws JMSException {
					BytesMessage message = arg0.createBytesMessage();
					ByteArrayOutputStream bos = new ByteArrayOutputStream();
					try {
						ObjectOutput out = new ObjectOutputStream(bos);
						out.writeObject(notification);
						out.close();
						message.writeBytes(bos.toByteArray());
						return message;
					} catch (IOException e) {
						throw new JMSException(e.getMessage());
					}
				}
			});
		} catch (JmsException exception) {
			// TODO: log error message
			return;
		}
	}
Finally, let's send some messages!
Edit the dockDoorListener as follows:
		//create a listener to handle Dock Door events
		StatementAwareUpdateListener dockDoorListener = new StatementAwareUpdateListener() {
			@Override
			public void update(EventBean[] arrivals, EventBean[] departures, EPStatement arg2,
					EPServiceProvider arg3) {
				if(arrivals!=null){
					for(EventBean bean : arrivals){
						String id = (String)bean.get("tag_ID");
						send(new ItemArrivalNotification(EZone.DOCK_DOOR, id));
					}
				}

				if(departures!=null){
					for(EventBean bean : departures){
						String id = (String)bean.get("tag_ID");
						send(new ItemDepartureNotification(EZone.DOCK_DOOR, id));
					}
				}

			}
		};
Similarly edit the weightStationListener:
		StatementAwareUpdateListener weighStationListener = new StatementAwareUpdateListener() {
			@Override
			public void update(EventBean[] arrivals, EventBean[] departures, EPStatement arg2,
					EPServiceProvider arg3) {
				if(arrivals!=null){
					for(EventBean bean : arrivals){
						String id = (String)bean.get("tag_ID");
						send(new ItemArrivalNotification(EZone.WEIGH_STATION, id));
					}
				}

				if(departures!=null){
					for(EventBean bean : departures){
						String id = (String)bean.get("tag_ID");
						send(new ItemDepartureNotification(EZone.WEIGH_STATION, id));
					}
				}

			}
		};
Finally edit the Alert Listener:
	StatementAwareUpdateListener alertListener = new StatementAwareUpdateListener() {
			@Override
			public void update(EventBean[] arrivals, EventBean[] departures,
					EPStatement arg2, EPServiceProvider arg3) {
				if (arrivals != null) {
					for (EventBean bean : arrivals) {
						int alertType = (Integer) bean.get("alert_type");
						String id = (String) bean.get("tag_ID");
						AlertNotification alert = null;
						switch (alertType) {
						case 1:
							alert = new AlertNotification(EAlertType.Package_Moved_Backwards, id);
							break;
						case 2:
							alert = new AlertNotification(EAlertType.Package_Skipped_Dock_Door, id);
							break;
						case 3:
							alert = new AlertNotification(EAlertType.Package_is_Lost, id);
							break;

						}
						if (alert != null) {
							send(alert);
						}
					}
				}
			}
		};
Export Notification Package
In order for another bundle to be able to use the Notification classes we created, we need to export the notification package.
- Open the Manifest.MF.
- Select the Runtime Tab.
- In the Exported Packages section, click add.
- Choose the com.northwind.rfid.shipping.notification package.
Writing A Web Application
Set up Project
What you will learn
- How to set up a web application project
Create the project
Just like when we created a new project for the Northwind application, we need to create a new project for the web application.
- Go to File-> New -> Project. Select "Plug-in Project" from the file chooser. Click "Next."
- Assign the project a name. For web applications, the application needs to end in 'war'. I chose com.northwind.rfid.shipping.war. Click next.
- Assign the plugin an ID, which is used to identify the bundle in the OSGi environment. Give it a descriptive name as well as the the name of the entity (company, person, project) that will maintain the bundle. For this bundle, we don't need the Activator, so uncheck that box.
Add the necessary files and folders
- Download and unzip this file: File:Tutorial-war-files.zip. It's a zip file that contains two files you will need.
- In the main project, make a new folder called 'WEB-INF'
- In the WEB-INF folder, make a new folder called 'jsp'
- In the WEB-INF folder, make a new file called web.xml
- Put the file spring.tld in the WEB-INF folder.
- In the META-INF folder, make a new folder called 'xsd'
- Put the file spring-beans-2.5.xsd in the xsd folder.
Your project should now look like this:

Configure the Manifest
Open up the Manifest.MF file. Click on the Dependencies tab.
- On the Required Plug-ins Section, add the following bundles
- com.northwind.rfid.shipping
- com.springsource.org.apache.taglibs.standard
- On the Imported Packages section, add the following packages
- javax.jms
- javax.servlet
- javax.servlet.http
- javax.servlet.jsp
- javax.servlet.jsp.jstl.core
- org.apache.activemq.command
- org.apache.activemq.spring
- org.springframework.jms.core
- org.springframework.jms.listener
- org.springframework.web.servlet
- org.springframework.web.servlet.mvc
- org.springframework.web.servlet.view
- Click the Manifest.MF tab. Add the following line to the end. Make sure there is an blank line as the last line of the Manifest.MF
Web-ContextPath: NORTHWIND-DEMO
Modify the web.xml
Open up the Web.xml file. Modify it to look like this:
<web-app version="2.4" xmlns="http://java.sun.com/xml/ns/j2ee"
	xmlns:xsi="http://www.w3.org/2001/XMLSchema-instance"
	xsi:schemaLocation="http://java.sun.com/xml/ns/j2ee
         http://java.sun.com/xml/ns/j2ee/web-app_2_4.xsd">

	<welcome-file-list>
		<welcome-file>index.jsp</welcome-file>
	</welcome-file-list>

	<jsp-config>
		<taglib>
			<taglib-uri>/spring</taglib-uri>
			<taglib-location>/WEB-INF/spring.tld</taglib-location>
		</taglib>
	</jsp-config>
</web-app>
When building web applications in java, the web.xml file provides configuration and deployment information for the Web components. Initially, we supply two pieces of information:
- The welcome file is page that is loaded by default when you go to 127.0.0.1:8080/NORTHWIND-DEMO
- The jsp-config provides the location of some jsp tags provided by spring.
Add a include.jsp
Make a new file called include.jsp inside of the jsp folder. Modify it to look like this:
<%@ page session="false"%>
<%@ taglib prefix="c" uri="http://java.sun.com/jsp/jstl/core" %>
<%@ taglib prefix="fmt" uri="http://java.sun.com/jsp/jstl/fmt" %>
This file simply includes some headers that we want on top of every JSP we will make. Therefore, in each JSP, we only have to have one include instead of several.
Modify index.jsp
Open up index.jsp. Modify it to look like this:
<%@ include file="/WEB-INF/jsp/include.jsp" %>

<jsp:useBean id="now" class="java.util.Date" />
Hello World at <fmt:formatDate value="${now}" pattern="MM.dd.yyyy" />
Here, we use some JSP tags to print out the date.
Run the web application
- Open up the run configuration and select the com.nortwind.rfid.shipping.war plugin. Run
- Point your browser to http://127.0.0.1:8080/NORTHWIND-DEMO/
If everything worked, you should see 'hello world' and the date.
Write a Hello World Servlet
What you will learn
- How to use Spring's MVC Controller
- How to write a servlet
- How to write a JSP
Write a JSP
Create a new file in the jsp directory called taglocation.jsp. Edit it as follows:
<%@ include file="/WEB-INF/jsp/include.jsp" %>
Hello World at <fmt:formatDate value="${model.date}" pattern="MM.dd.yyyy" />
As you can see, this does the same thing as the index page, except it will get the date passed in from the Contoller in the "model" instead of getting it from a JSP tag.
Write a Controller
The next thing to do is to create the controller. The controller's purpose is to pass in a model to the view. In this case, our model is simply a date object. However, this will change when we hook up our web app to our RFID application. For now, create a new package called <tt?>com.northwind.rfid.shipping.war</tt>. Create a new Java class called TagLocationController. Edit it as follows:
package com.northwind.rfid.shipping.war;

import java.util.Date;
import java.util.HashMap;

import javax.servlet.http.HttpServletRequest;
import javax.servlet.http.HttpServletResponse;

import org.springframework.web.servlet.ModelAndView;
import org.springframework.web.servlet.mvc.Controller;

/**
 * @author Kyle Neumeier - [email protected]
 *
 */
public class TagLocationController implements Controller{

	@Override
	public ModelAndView handleRequest(HttpServletRequest arg0,
			HttpServletResponse arg1) throws Exception {
		HashMap<String, Object> model = new HashMap<String, Object>();
		model.put("date", new Date(System.currentTimeMillis()));

		return new ModelAndView("/WEB-INF/jsp/taglocation.jsp", "model", model);
	}

}
What happens now is that anytime a web page that is controlled by this controller is loaded, the handleRequest method will be invoked. This method simply passes in a model object to the proper jsp.
Modify the web.XML
Now we need to modify the web.xml so that the controller will be loaded at the proper time. The web.xml should now look like this:
<web-app version="2.4" xmlns="http://java.sun.com/xml/ns/j2ee"
	xmlns:xsi="http://www.w3.org/2001/XMLSchema-instance"
	xsi:schemaLocation="http://java.sun.com/xml/ns/j2ee
         http://java.sun.com/xml/ns/j2ee/web-app_2_4.xsd">
	<welcome-file-list>
		<welcome-file>index.jsp</welcome-file>
	</welcome-file-list>

	<jsp-config>
		<taglib>
			<taglib-uri>/spring</taglib-uri>
			<taglib-location>/WEB-INF/spring.tld</taglib-location>
		</taglib>
	</jsp-config>

	<servlet>
		<servlet-name>NorthwindDemo</servlet-name>
		<servlet-class>org.springframework.web.servlet.DispatcherServlet</servlet-class>
		<load-on-startup>1</load-on-startup>
	</servlet>

	<servlet-mapping>
		<servlet-name>NorthwindDemo</servlet-name>
		<url-pattern>/taglocation.htm</url-pattern>
	</servlet-mapping>

</web-app>
The two things we did here:
- Told the web application about a servlet called NorthwindDemo.
- Told the web application to invoke the NorthwindDemo servlet whenever a page called 'taglocation.htm' is requested.
Create a servlet xml
Now we need to create a servlet XML that controls how the NorthwindDemo servlet behaves. Create a new file called NorthwindDemo-servlet.xml (the name of the file must be the name of the servlet with "-servlet.xml" appended to it). Make the servlet xml look like this:
<beans xmlns="http://www.springframework.org/schema/beans"
	xmlns:xsi="http://www.w3.org/2001/XMLSchema-instance" xmlns:osgi="http://www.springframework.org/schema/osgi"
	xmlns:amq="http://activemq.apache.org/schema/core"
	xsi:schemaLocation="http://www.springframework.org/schema/beans
	META-INF/xsd/spring-beans-2.5.xsd
    http://www.springframework.org/schema/osgi
    http://www.springframework.org/schema/osgi/spring-osgi.xsd">

	<bean name="/taglocation.htm" class="com.northwind.rfid.shipping.war.TagLocationController" />

</beans>
Modify index.jsp
The last thing to do is to modify our welcome file so that we are redirected to 'taglocation.htm' by default
<%@ include file="/WEB-INF/jsp/include.jsp" %>

<%-- Redirected because we can't set the welcome page to a virtual URL. --%>
<c:redirect url="/taglocation.htm"/>
Run It!
When you run the web application again (or use the 'update' trick) and point your browser to http://127.0.0.1:8080/NORTHWIND-DEMO, you should see the same Hello World message as last time. This time however, the back end is using Spring's Web MVC framework.
Write at TagLocation Service
Now that we have all the MVC plumbing working, we need to hook up the RFID application with the web application. We will do this by creating a service that the controller can use to find out the list of tags at each stage. Then we will write a JMS listener who will update the service with the latest information. Finally we will inject the service into the contoller.
Write a Service Interface
Write a Manager Interface
Implement the Service
Write a JMS Listener
Modify the Controller
Modify the servlet xml
Create the Northwind webpage
Putting it all together
Exporting the application
What you will learn:
- Exporting your application out of eclipse
- Running the application in a deployed instance of Rifidi Edge Server