Difference between revisions of "Northwind Tutorial"
From RifidiWiki
(→Stating Dependencies in the Manifest) |
(→Creating the Application) |
||
| Line 36: | Line 36: | ||
==Creating the Application== | ==Creating the Application== | ||
| + | Now it's time to actually create the source code for the application. | ||
| + | #Right-click on the 'com.mycompany.rfid.app' package and select New->Class | ||
| + | #Give the class a name. I chose MyApplication. Click finish. | ||
| + | #Add a private member of type <tt>EsperManagementService</tt>. Also make it volatile since the Spring thread will inject the reference (actually a dynamic-proxy) to the object. The volatile keyword will prevent us from experiencing the [http://jeremymanson.blogspot.com/2008/11/what-volatile-means-in-java.html visibility problem] in java. | ||
| + | #Add a public setter method. to set the service. This is the method that spring will call when it creates our object. | ||
| + | #Add a constructor. | ||
<pre> | <pre> | ||
package com.mycompany.rfid.app; | package com.mycompany.rfid.app; | ||
| Line 66: | Line 72: | ||
} | } | ||
</pre> | </pre> | ||
| + | |||
==Creating the Spring Context XML== | ==Creating the Spring Context XML== | ||
<pre> | <pre> | ||
Revision as of 18:51, 25 September 2009
This document provides step-by-step instructions on how to get started on developing your first application that runs on the Rifidi Edge Server. The application we will develop will use Esper to collect tag reads from a reader and put them on a JMS queue to be consumed by a client application. Many of the steps are applicable to many kinds of plugins for the edge server, including creating a sensor plugin.
Contents
Prerequisites
For this tutorial, we will use Eclipse to develop the application. While it would be possible to develop the application in any IDE that you are familiar with, Eclipse provides great tooling around OSGi application development and deployment, and thus makes this process much easier. If this is your first time developing with eclipse, there will be a learning curve. However, the payoff is worth it.
To get started see Setting up a Development Environment.
Creating the new project
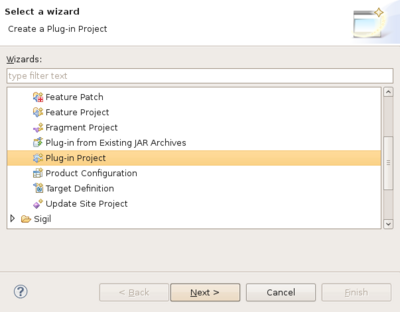
First thing you need to do is to create a new OSGi bundle (aka plug-in) project using the wizard provided by eclipse.
- Go to File-> New -> Project. Select "Plug-in Project" from the file chooser. Click "Next."

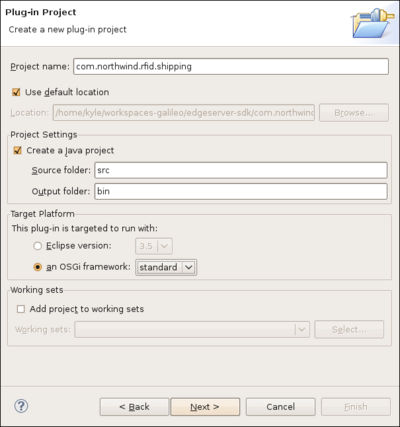
- Assign the project a name (I called mine "com.mycompany.rfid.app"). Make sure the plugin is targeted to run with the standard OSGi framework. This makes sure that your plugin is general enough to be deployed in any OSGi runtime (felix, knoplerfish, etc). Click next..
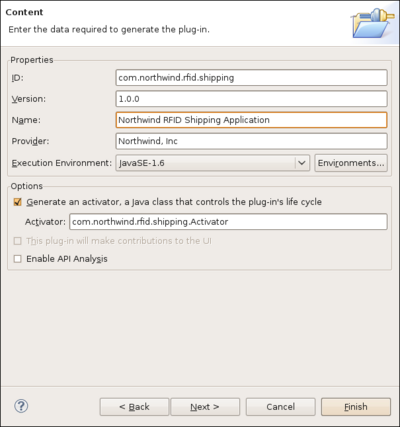
- Assign the plugin an ID, which is used to identify the bundle in the OSGi environment. Give it a descriptive name as well as the the name of the entity (company, person, project) that will maintain the bundle. For this bundle, we will keep the Activator, although most of the time when you use spring DM (as we are), it is not necessary to have the activator. Click Finish.


First Things First: Injecting Esper
What you will learn:
- Declaring OSGi bundle dependencies in the manifest
- Dependency injection via spring
- Running an OSGi application in eclipse
- Redeploying bundles without restarting the server
Stating Dependencies in the Manifest
| ClassNotFoundException |
| Sometimes when running a bundle, you will get a ClassNotFoundException even though there were no compile-time errors in your source code. Many times, this is easily solved by adding the package of the problematic class to the import-package statement in the Manifest of your bundle. |
An OSGi bundle is simply a jar with some extra information in the manifest. Part of that information is the dependencies of the bundle. There are two ways to state dependency information: bundle-dependencies, and package-dependencies. A bundle dependency means that the bundle you are creating can see all of the exported package of the bundle that is depended on. A package dependency means that some bundle in the OSGi runtime must export that package, but it doesn't matter which bundle. Bundle dependencies are often simpler to state if you will use a large number of packages from the same bundle. However, package dependencies are more flexible since the dependency can be met from any bundle. They make alot of sense for things like javax or apache commons packages since you generally don't know or care exactly which bundle you will use.
In order to get Esper running, we will need to make two bundle-dependencies in the Manifest.
- Open up the Manifest.MF file in the META-INF folder
- Click on the dependencies tab at the bottom of the editor.
- Click "Add" in the Required Plug-ins section.
- Add org.rifidi.edge.core.services and org.rifidi.com.espertech.esper.
- Save the changes.

Creating the Application
Now it's time to actually create the source code for the application.
- Right-click on the 'com.mycompany.rfid.app' package and select New->Class
- Give the class a name. I chose MyApplication. Click finish.
- Add a private member of type EsperManagementService. Also make it volatile since the Spring thread will inject the reference (actually a dynamic-proxy) to the object. The volatile keyword will prevent us from experiencing the visibility problem in java.
- Add a public setter method. to set the service. This is the method that spring will call when it creates our object.
- Add a constructor.
package com.mycompany.rfid.app;

import org.rifidi.edge.core.services.esper.EsperManagementService;

/**
 * @author Kyle Neumeier - [email protected]
 *
 */
public class MyApplication {

	/**Esper service*/
	private volatile EsperManagementService esperService;

	/**
	 * Constructor
	 */
	public MyApplication() {

	}

	/**
	 * Called by spring
	 * @param esperService
	 */
	public void setEsperService(EsperManagementService esperService) {
		this.esperService = esperService;
	}
}
Creating the Spring Context XML
<beans xmlns="http://www.springframework.org/schema/beans"
	xmlns:xsi="http://www.w3.org/2001/XMLSchema-instance"
	xmlns:osgi="http://www.springframework.org/schema/osgi"
	xmlns:amq="http://activemq.apache.org/schema/core"
	xsi:schemaLocation="http://www.springframework.org/schema/beans
	http://www.springframework.org/schema/beans/spring-beans-2.5.xsd
    http://www.springframework.org/schema/osgi
    http://www.springframework.org/schema/osgi/spring-osgi.xsd">

	<!-- Create the  Application bean and inject dependencies-->
	<bean id="rfidapp" class="com.mycompany.rfid.app.MyApplication">
		<property name="esperService" ref="esper" />
	</bean>

	<!-- Get a reference to the Esper Management Service from the OSGi Service Registry -->
	<osgi:reference id="esperManagementService"
		interface="org.rifidi.edge.core.services.esper.EsperManagementService" />
</beans>
Running the Application
Modifying and redeploying the Application
Event Stream Processing
What you will learn:
- Using Rifidi Emulator to speed up RFID development
- Writing Esper queries and listeners
Sending out events with JMS
What you will learn:
- Importing the JMS services provided by Rifidi Edge Server
- Sending out events over JMS
Exposing events with web services
What you will learn
- Exporting a service with Web Services
Control With RMI
What you will learn:
- Providing an RMI interface for control of your application
- Creating an API bundle
- Creating a client application for your application
Exporting the application
What you will learn:
- Exporting your application out of eclipse
- Running the application in a deployed instance of Rifidi Edge Server